Appearance
New Asset Detail Checklist (NADC)
INFO
Note: New Asset Detail Checklists can only be viewed and created by users who have been granted the relevant permissions.
WARNING
The New Asset Detail Checklist (NADC) replaces the Purchase Inspection, which has been retired from the web. Any asset that would previously have received a purchase inspection now receives a New Asset Detail Checklist instead, and existing purchase inspection records are now shown and managed as NADCs.
A New Asset Detail Checklist lets the service desk verify an asset's identity fields and category-specific Asset Details, and walk a technician through a set of organization-wide questions, before the asset is signed off. It appears on the Service page alongside your other work orders and inspections.
When A Checklist Is Created
A New Asset Detail Checklist can be created in two ways:
- On asset creation — controlled by the Create New Asset Detail Checklist On Asset Creation organization setting (Platform Settings → Assets → Purchase tab), which is set to Always, Prompt, or Never. When set to Prompt, a Confirm New Asset Detail Checklist dialog appears while saving a new asset, asking "Do you also wish to create a New Asset Detail Checklist against this asset?" — choose Create Checklist or Proceed Without Checklist.
- On demand — for an asset that never received one (for example it was set off or imported) or whose checklist was deleted. See Creating A Checklist On Demand below.
INFO
Only one open checklist is allowed per asset at a time. Creating one on demand for an asset that already has one open is rejected.
Viewing NADC Rows On The Service Page
Head to the Service Page via the Left Navigation Menu. New Asset Detail Checklists appear as rows in the work/inspections table, labelled New Asset Detail Checklist in the Type column (their Work Time and Due Amount columns are blank, as with inspections). Use the Work Type filter and select New Asset Detail Checklist to narrow the table to just these rows.
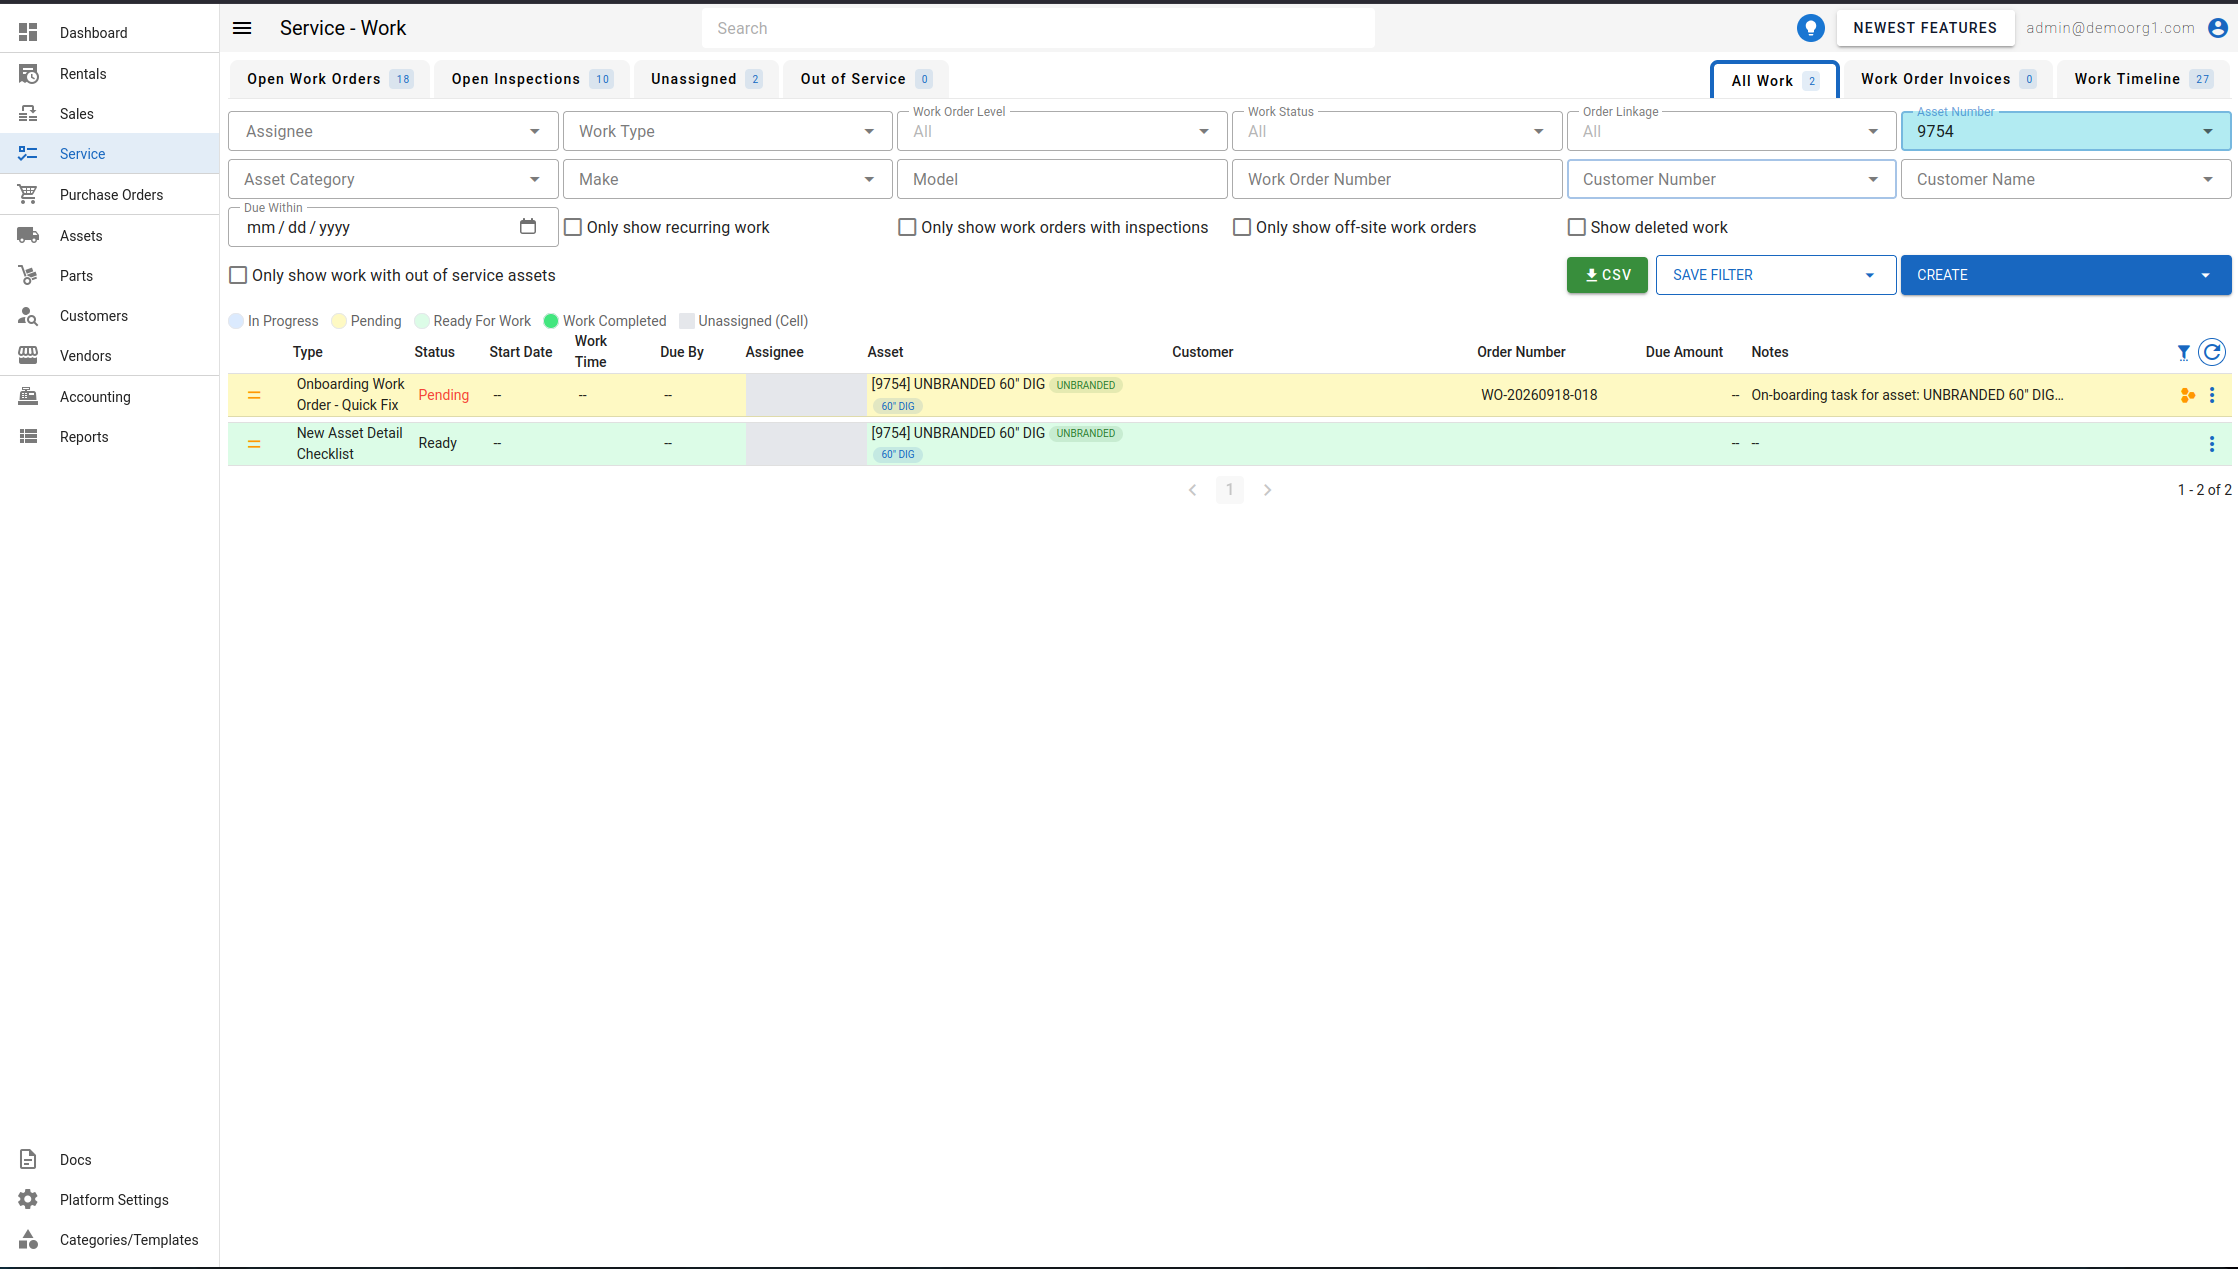
Clicking a NADC row opens the checklist in the popup described below. Right-clicking a row instead opens a dedicated action menu:
- Open Checklist — opens the checklist popup.
- Mark as Ready — releases a
Pendingchecklist (to its assignee, if one is set) without having to open it first; only offered while the checklist isPending. - Submit For Review — lets the desk submit the checklist on the technician's behalf, moving it to
Work Completed. Only offered while the checklist isReadyorIn Progress. - View Asset — opens the checklist's asset in place (as a popup).
- Delete — soft-deletes the checklist with a required reason, offered for any status except
Done.
Creating A Checklist On Demand
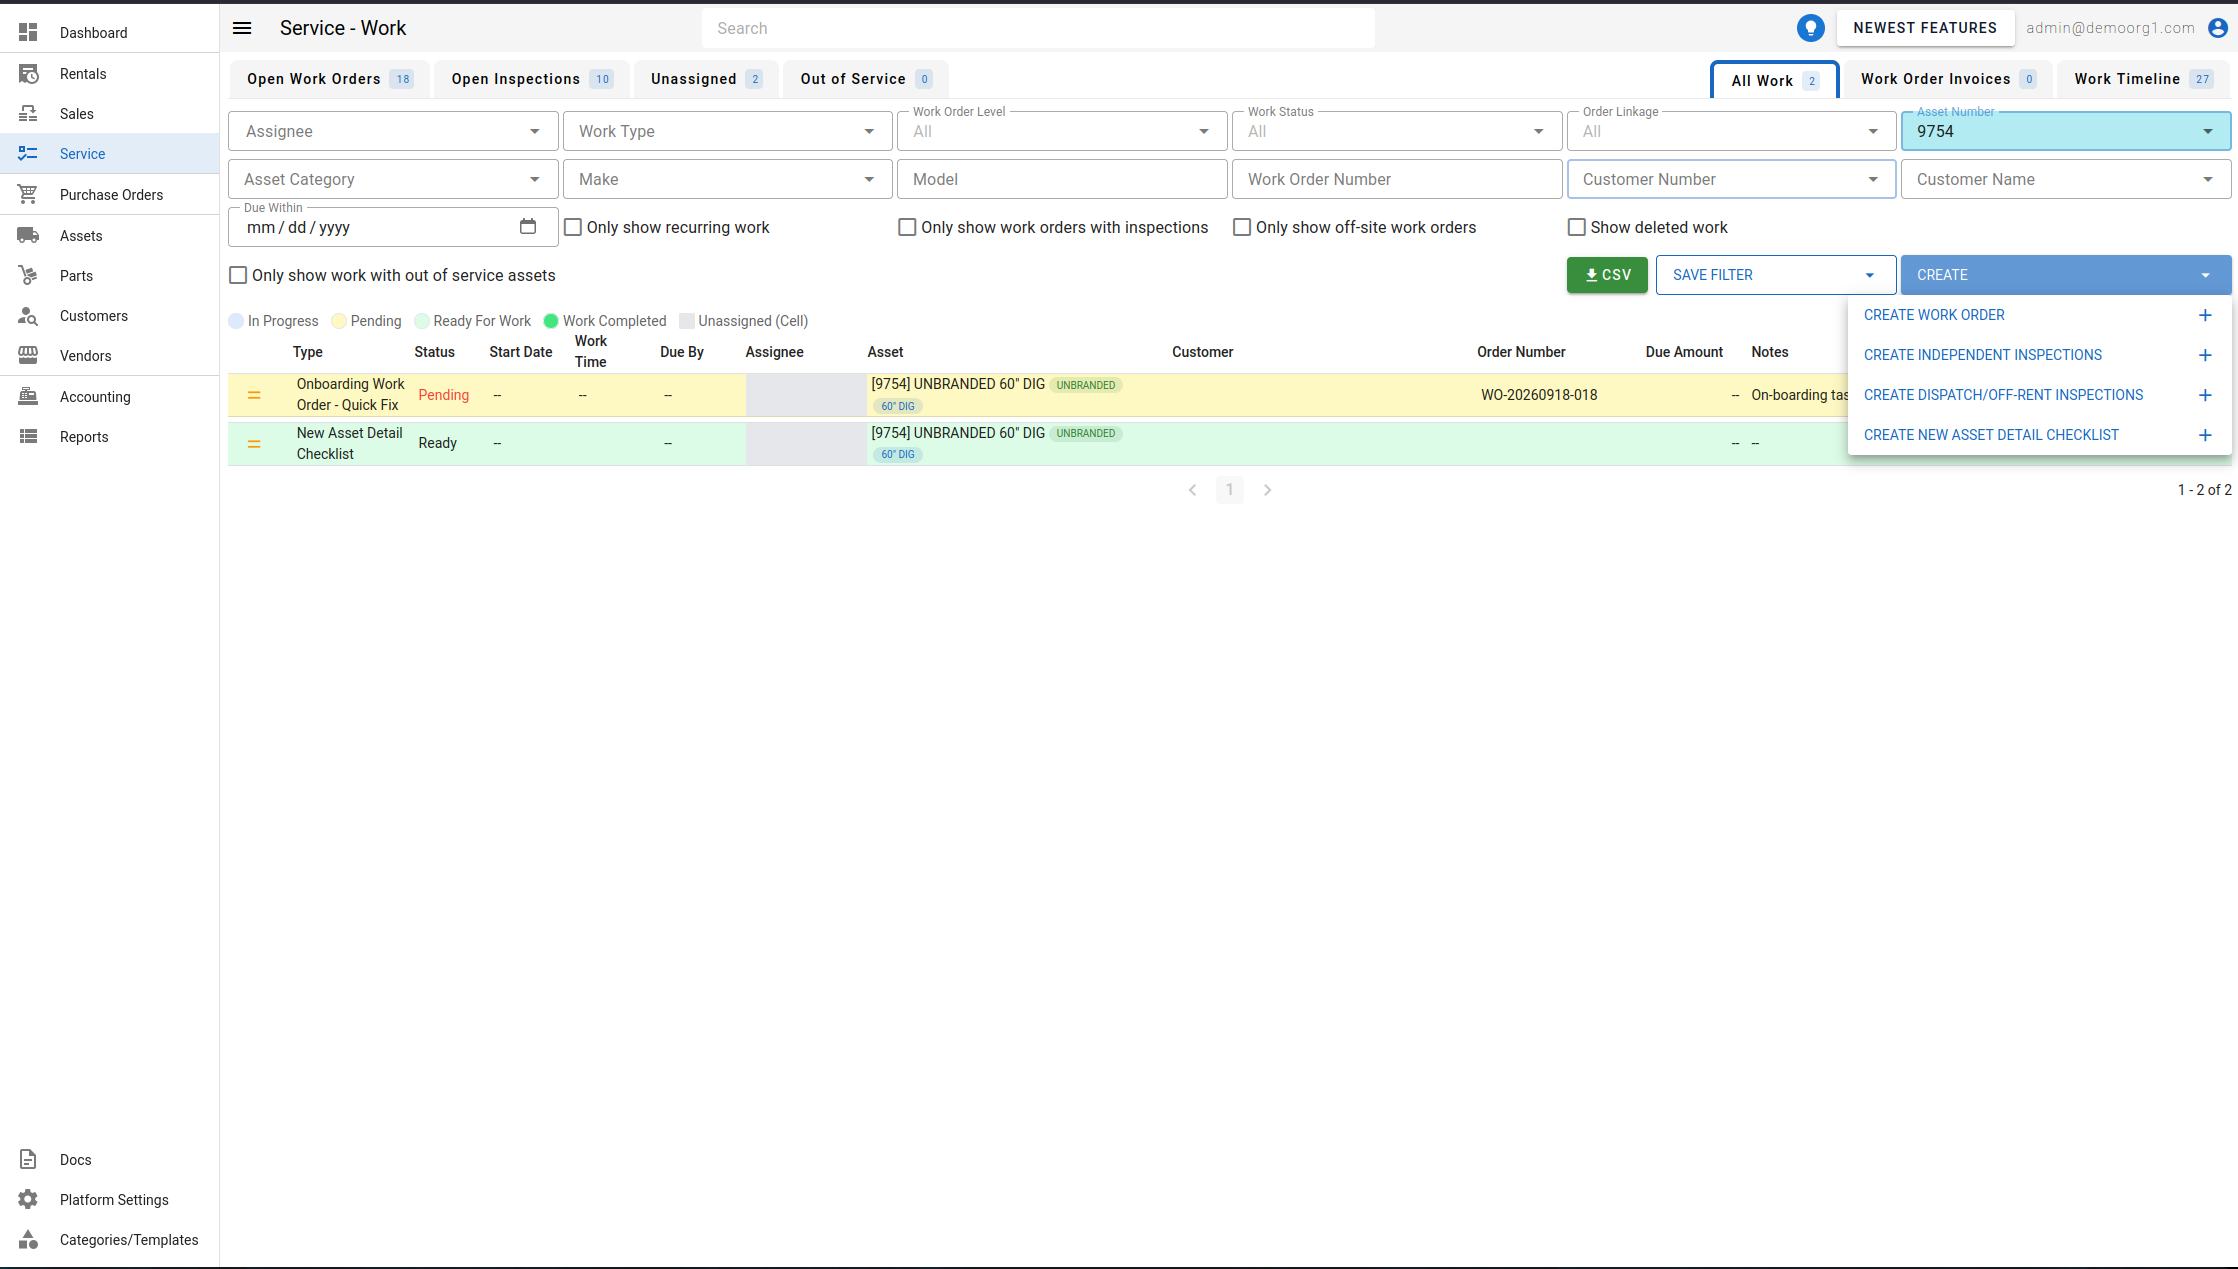
Head to the Service Page via the Left Navigation Menu. Click on the Create button visible on the top right corner of the page and then click on the Create New Asset Detail Checklist button in the resultant drop-down.
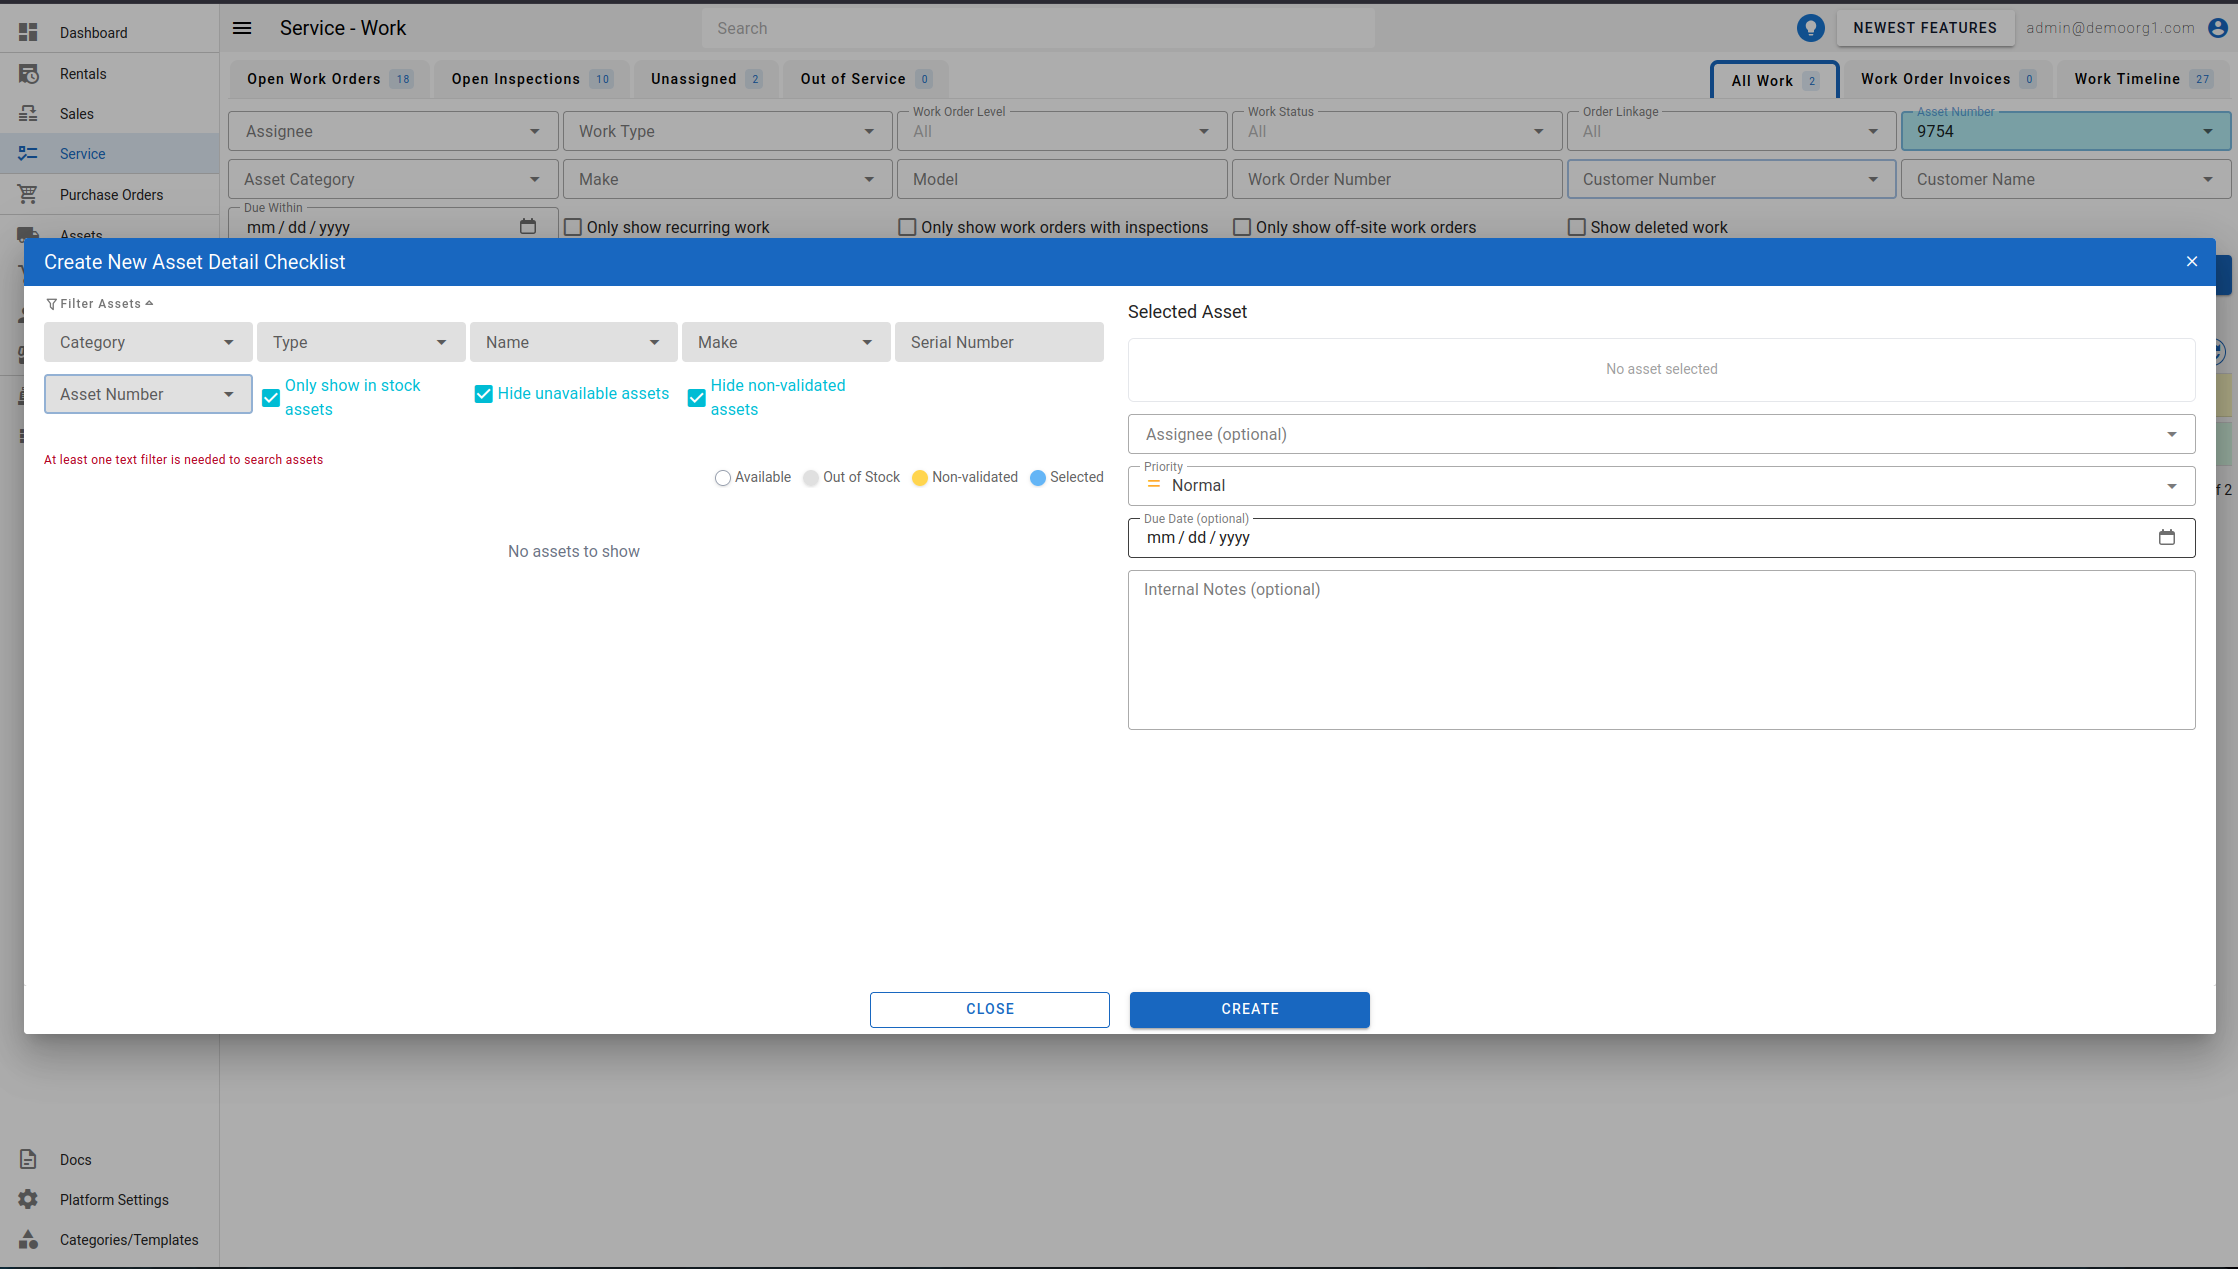
The Create New Asset Detail Checklist popup shows an asset-selection interface on the left (single asset only) and the checklist's fields on the right: Assignee (optional), Priority (High or Normal, defaulting to Normal), Due Date (optional), and Internal Notes (optional). Select an asset and fill in whichever fields you need, then click Create.
A notification confirms the checklist was created, and the new checklist opens automatically in the popup.
INFO
A checklist created on demand always starts out Pending, even if you set an Assignee — naming an assignee no longer releases it to them automatically. Use Mark as Ready (in the popup or the row's context menu) when it's ready to hand over.
The Checklist Popup
The New Asset Detail Checklist popup features two tabs: Details and Checklist. A Copy Link icon in the toolbar copies a direct link to the checklist (?nadc_id= on the Service page), and the footer shows the checklist's GUID (click to copy) alongside Close and Save & Close buttons.
INFO
The popup auto-saves in the background shortly after you stop making changes, so you rarely lose an edit by navigating away. Save & Close still saves anything not yet auto-saved, then always closes the popup.
Details Tab
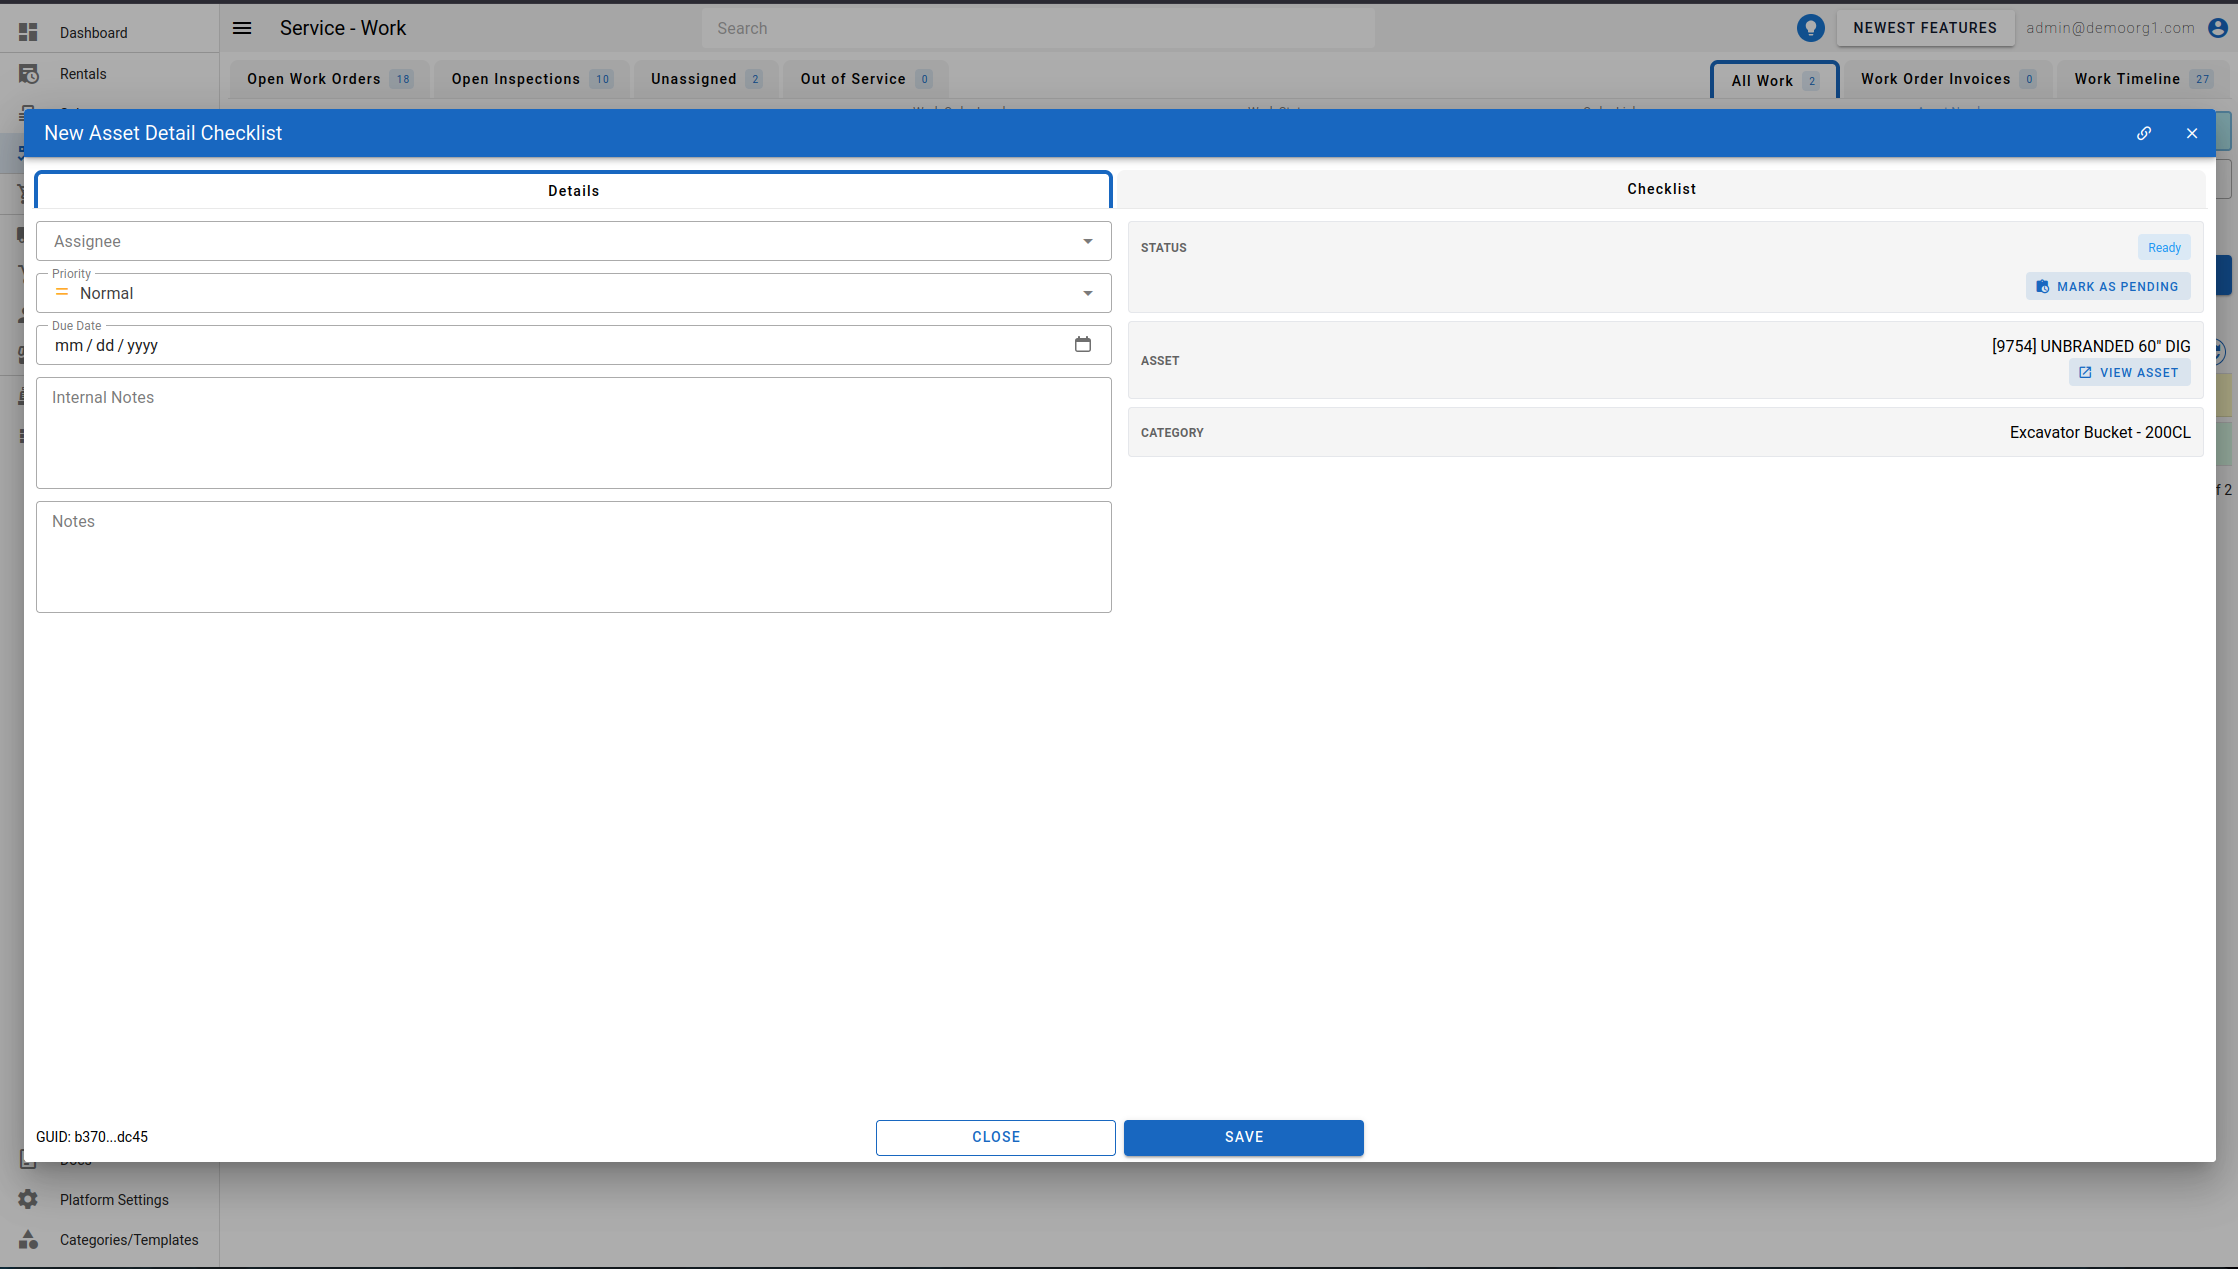
On the left, the desk can set the checklist's Assignee, Priority, Due Date, and Internal Notes (Internal Notes is only visible to the service desk); a free-text Notes field beneath them is available to whoever can edit the checklist's answers. On the right, info cards summarize the record:
- Status — the checklist's current status (see Desk Workflow below), with lifecycle action buttons when applicable.
- Asset — the asset number and name, with a View Asset button.
- Category — the asset's category, when it has one.
- Applied To Asset — appears once the checklist has been approved, summarizing how many identity fields and Asset Details were written to the asset (plus whether the Hour Meter reading was written, when the asset has one), along with anything skipped or errored.
Checklist Tab
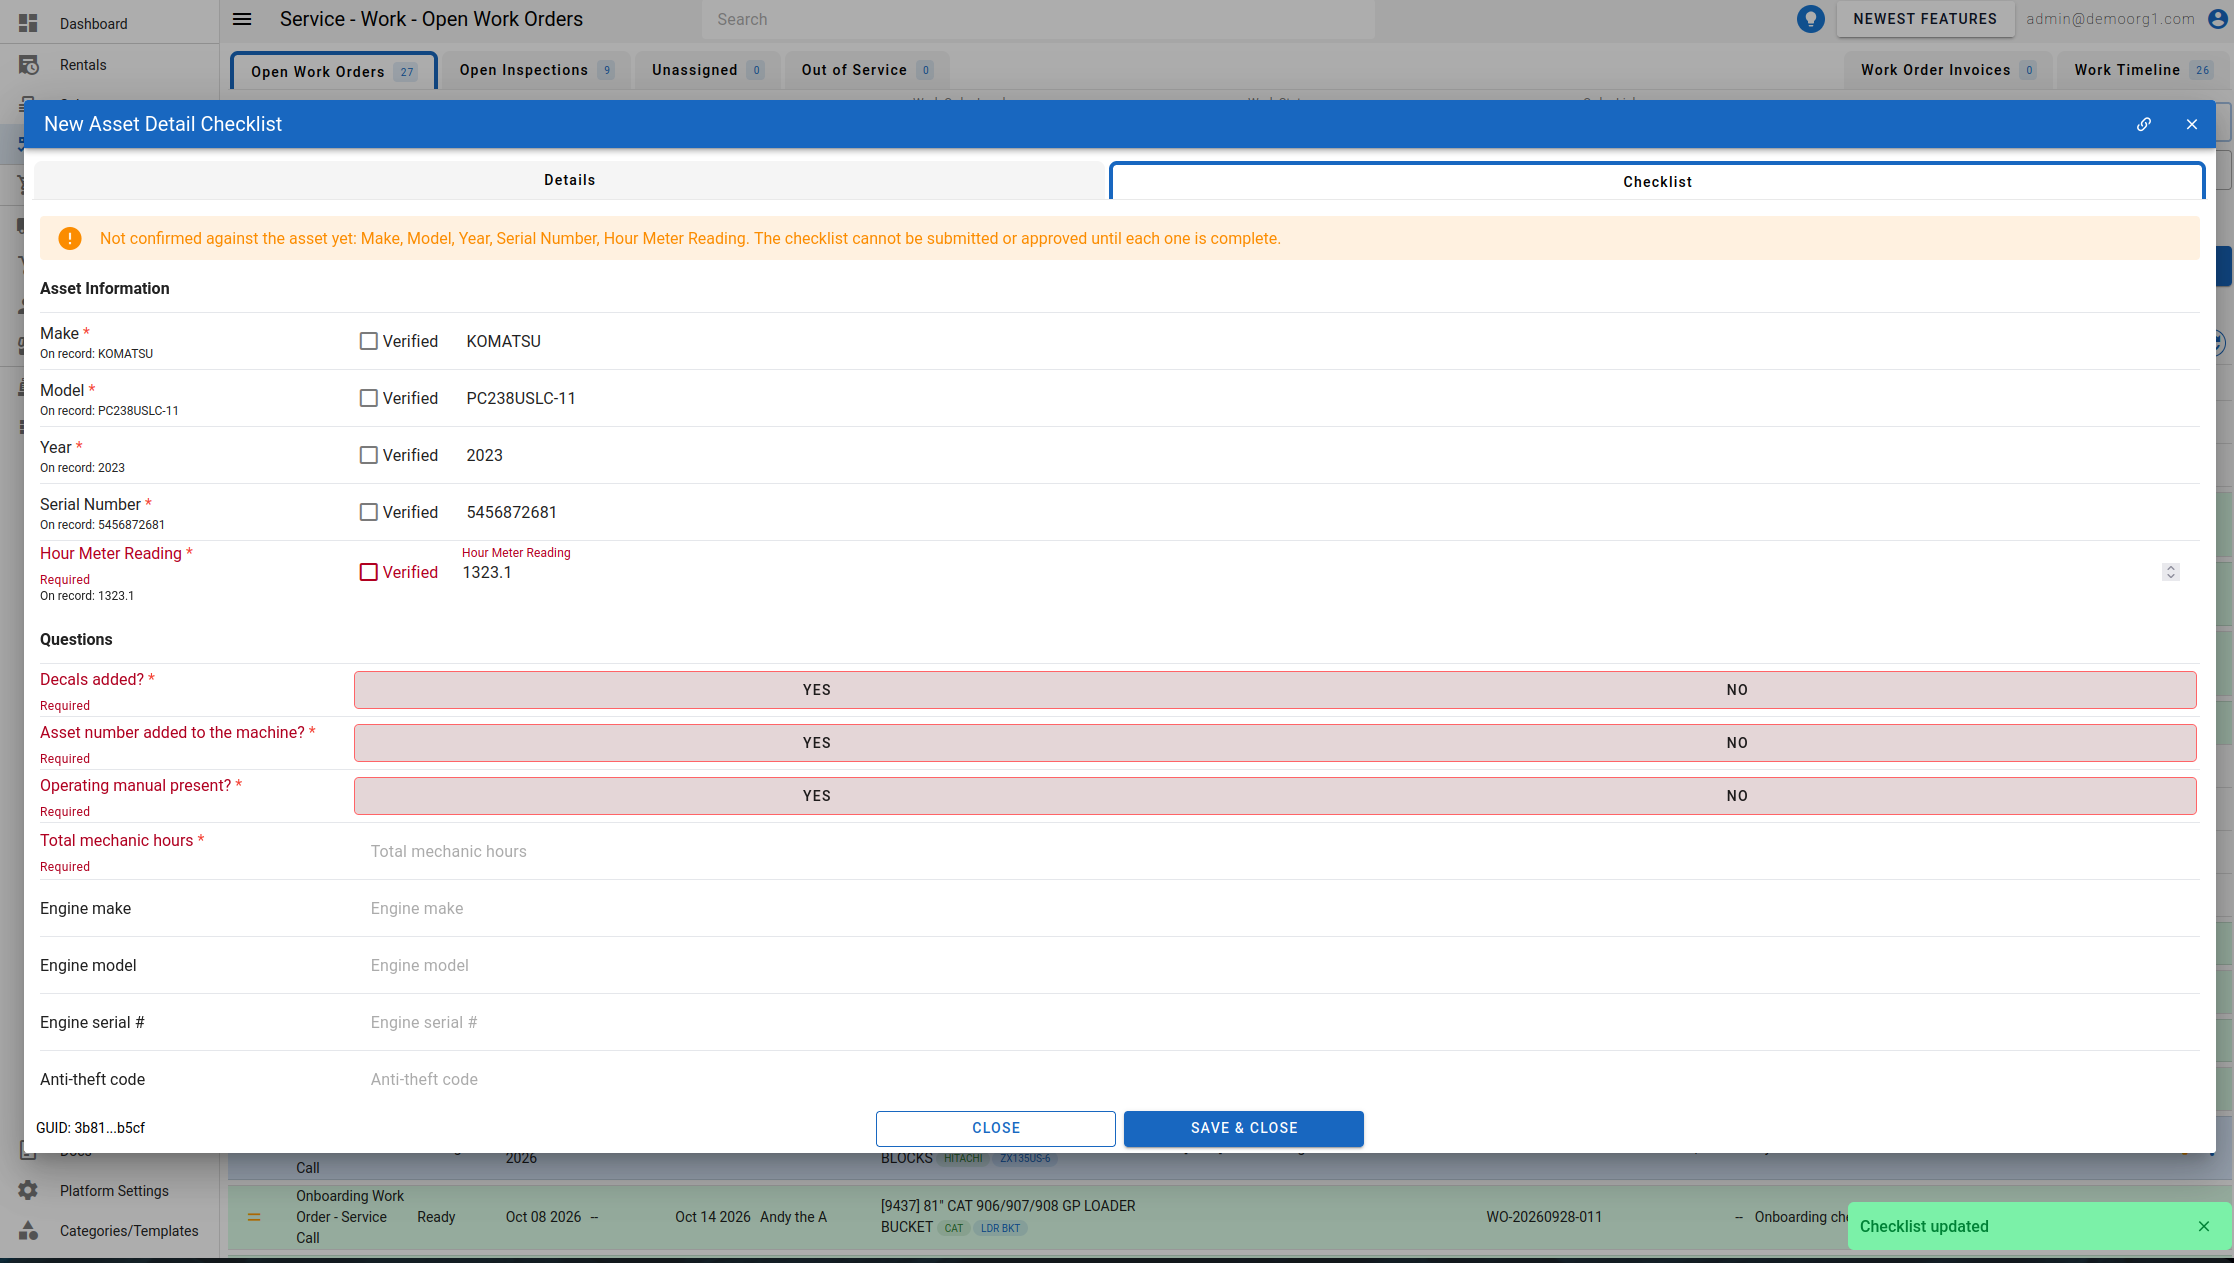
Checklist items are grouped into three sections:
- Asset Information — the asset's four identity fields (Make, Model, Year, Serial Number), each shown alongside its current value on record so the technician can confirm what's printed on the asset, plus an Hour Meter reading item when the asset has one. Rendered as a table, matching the asset's Details tab.
- Questions — the organization's generic New Asset Detail Checklist questions (see Editing The Question Set below), shown as a stacked list.
- Asset Details — the asset's category-specific Asset Details fields, also rendered as a table with the field's current value shown for reference.
Each Question / Asset Details item can be one of the following types:
| Item Type | Control |
|---|---|
| Text | A free-text field. |
| Number | A numeric entry. |
| Dropdown | A single choice from a fixed list of options. |
| Pass / Fail | A two-button Pass / Fail toggle. |
| Yes / No | A two-button Yes / No toggle. |
| Yes / No and Gauge | A Yes / No toggle paired with a numeric reading (gauge) field. |
| Check and Gauge | A toggle paired with a numeric reading (gauge) field. |
These correspond to the question types chosen in the NADC question-set editor under Platform Settings → Checklists. The old Checkbox item type has been retired — boolean questions are now a two-button Yes / No (or Pass / Fail) toggle.
INFO
Make, Model, Year, and Serial Number must each be explicitly confirmed before the checklist can be submitted or approved — a Verified checkbox sits beside the value (prefilled from the asset); tick it once the printed value matches, or correct the value first and then tick it (the corrected value is what's written back to the asset on approval). The Hour Meter item works the same way, but needs both a Verified tick and a numeric reading — either half can be saved on its own, but both are needed for the item to count as complete.
While any of these is still incomplete, a warning banner names them: "Not confirmed against the asset yet: <items>. The checklist cannot be submitted or approved until each one is complete." Clicking Approve with something still incomplete shows the same list in a toast instead of approving.
Required items are marked with a red asterisk, and turn red — label and control both — the moment you open the Checklist tab if they're still unanswered, rather than only after you touch them. Editing items is only possible while the checklist is Ready or In Progress (or, for a reviewer correcting an answer, while it's Work Completed) — see Desk Workflow.
INFO
While the checklist is Pending, an info banner reads "Editing Checklist Items is disabled. Update the checklist status to 'Ready' to enable editing items."
Like the Work Order Popup, the Save & Close button is never disabled — a red dot appears on it whenever there are changes the auto-save hasn't caught up with yet.
Desk Workflow
A New Asset Detail Checklist moves through the following statuses:
| Status | Meaning | Available actions |
|---|---|---|
Pending | Newly created; not yet released to the technician. Desk fields can be set, but checklist items can't be answered yet. | Mark as Ready |
Ready | Released and awaiting the technician's answers. | Mark as Pending (send back), or the technician answers items and Submit For Review |
In Progress | The technician has started answering items. | Submit For Review |
Work Completed | Submitted for review. Answers can only be corrected by a reviewer at this point. | Approve, or Return to Technician (sends it back to In Progress) |
Done | Approved. Terminal — the checklist can no longer be edited or deleted. | — |
INFO
Desk fields (Assignee, Priority, Due Date, Internal Notes) and the Mark as Ready / Mark as Pending / Return to Technician actions require full inspection access (the service desk); a technician answering their own checklist can still save their answers and use Save & Close without it.
Approving A Checklist
Once a checklist reaches Work Completed, a reviewer can click Approve in the popup's footer. Approving is confirmed with a prompt ("Approving applies the answers to the asset and marks the checklist done. It cannot be edited afterwards. Continue?"), then writes the checklist's answers onto the asset and moves the checklist to Done. Any value the technician changed on the checklist (for example a corrected Make, Model, Year, Serial Number, Hour Meter reading, or an Asset Details value) is carried forward to the approval — what gets written to the asset is the technician's changed value, not the value that was on record before. If any value couldn't be written to the asset, the checklist still moves to Done, and the failure is called out both in the confirmation notification and on the Applied To Asset card in the Details tab.
Editing The Question Set
See Editing the New Asset Detail Checklist Question Set for how to change the generic questions asked on every checklist.